Automate Transaction Sending with Web3 Actions and Tenderly Node
Tenderly integrates access to Web3 Gateway in Web3 Actions. With a single line of code, you can now access the Mainnet or supported testnets directly from your Web3 Action function code and automatically send transactions or query on-chain data.
In this post
Web3 Actions enable dapps to monitor on-chain events and automatically trigger the execution of custom code when the event occurs. With built-in support for Ethers.js, Web3 Actions also allow you to call different RPCs and interact with the blockchain.
To streamline this process even further, we integrated access to Tenderly’s production node directly into Web3 Actions, eliminating the need to manage external RPC URLs and access keys.
With just a single line of code, you can now access the Mainnet or supported testnets directly from your Web3 Action function code and automatically send transaction or query on-chain data.
Web3 Actions & Tenderly Node: A Quick Refresher
Before digging deeper, let’s do a quick recap of what Web3 Actions and Tenderly Node are and how they work together to remove friction in your dapp development workflows.
Web3 Actions are serverless functions that allow you to respond to on-chain events with custom code. Web3 Actions can help you connect on-chain and off-chain systems and have them work together to power your dapp.
For example, you can use Web3 Actions to automate transaction sending, gather on-chain data for analytics, or build advanced on-chain monitoring systems. For more details on how Web3 Actions work, our documentation has you covered.
On the other side, Tenderly Node is our node as a service that provides reliable, stable, and extremely fast blockchain access. This is a production node that can be used to send transactions, deploy contracts, or query on-chain data. Our node gives you a single RPC URL of the network you want to access, simplifying the process of connecting to the Mainnet or supported testnets.
By integrating node access into Web3 Actions, you no longer have to include sensitive data like access keys in your Web3 Action functions. This makes your dapps more secure and easier to maintain. In fact, all you need is a single line of code to enable network access for your dapp.
Transaction simulations available in Tenderly Node
Need to test out if your transaction will go through before sending it on-chain and risking a failure? We developed a custom RPC endpoint within Tenderly Node to give you the ability to run simulations on any number of transactions through the same RPC URL.
The tenderly_simulateTransaction RPC endpoint allows you to simulate transactions against the latest state. No need to use different RPC URLs for simulations and transaction sending.
All you have to do is add the Tenderly Node URL to your Web3 Action function code and call the tenderly_simulateTransaction RPC endpoint. Once you’re happy with the results of the simulation, simply switch the call to eth_sendRawTransaction and send the transaction.
Top 3 benefits of node access in Web3 Actions
There are several use cases in which accessing Tenderly Node through Web3 Actions can come in handy, including automated transaction sending, building advanced blockchain monitoring systems, and maintaining the integrity of your dapp.
- Automatically send transactions in response to on-chain events: Web3 Actions allow you to monitor certain on-chain events, analyze the state, and react to any changes by automatically sending transactions. If you’re building components for a system, Web3 Actions can help you simplify the development process and improve the performance and security of your dapp.
- Build an advanced monitoring system for your dapp and smart contracts: With access to Tenderly’s node built directly into Web3 Actions, it’s much easier to build components for a complex smart contract monitoring system. It enables you to combine transaction data with on-chain data which you gather using Web3 Actions. In combination with Web3 Action Storage, this also enables you to perform additional analysis and indexing.
- Ensure the integrity of your dapp: Web3 Actions allow you to periodically and programmatically check the state of your dapps and ensure that the system is functioning as intended. For example, in case of a hack, you are instantly notified about specific transactions that might be causing undesired effects, allowing you to react quickly and prevent further damage.
How to access Tenderly Node through Web3 Actions
Web3 Actions are designed to execute custom code when a certain on-chain event happens. This custom logic is Javascript or Typescript code that is added as the function of your Web3 Action. A function is a term used within Web3 Actions to refer to custom code that gets executed when the Web3 Action is triggered.
If you need more details about the different Web3 Actions components, such as events, triggers, and functions, our documentation has all the resources you need to get you up to speed.
Setting up a Web3 Action to access the Mainnet
Open up your Dashboard and go to Web3 Actions. Get started by selecting the Trigger Type. This is the type of event that will serve as the trigger for your custom code to run.
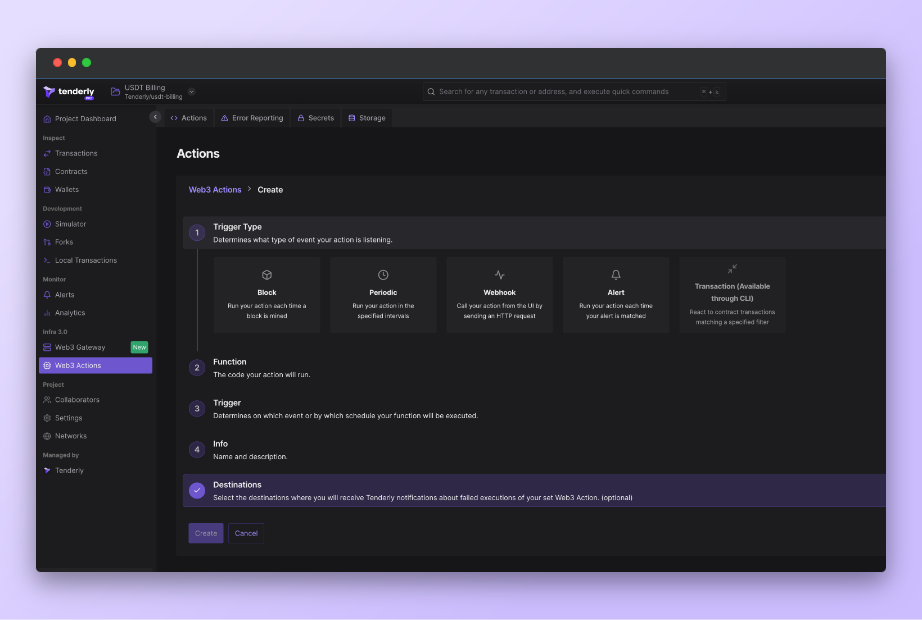
Based on the Trigger Type you select, the function code field will be pre-populated with the boilerplate code needed for the Web3 Action to work.
To unlock access to our node within your Web3 Actions function, you need to define a single variable within the default actionFn variable like so.
const defaultGatewayURL = context.gateways.getGateway(Network.MAINNET);
To illustrate how this works, we are accessing the Mainnet through the node to get the block number of the latest block. Whenever a new block is mined, this Web3 Action will run this code to get the number of the block and log it to the console.
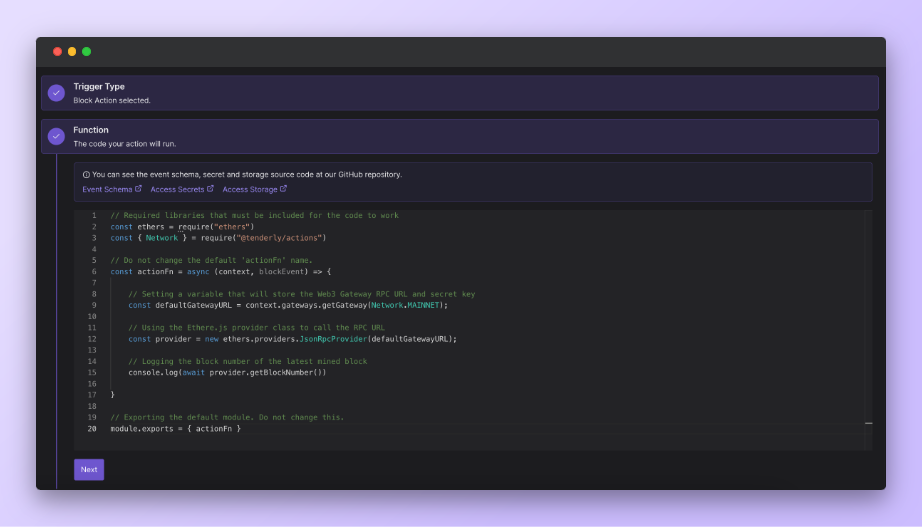
Accessing the node within Web3 Actions
In the example above, we’re defining the defaultGatewayURL variable, which contains the Tenderly Node RPC URL and the secret key. We’re also using Ethers.js to call the RPC URL, get the latest block number with the getBlockNumber function, and log the result to the console.
If you want to test out the example, you can copy/paste the code snippet below into your Web3 Action function and see it in action.
// Required libraries that must be included for the code to work
const ethers = require("ethers")
const { Network } = require("@tenderly/actions")

// Do not change the default 'actionFn' name.
const actionFn = async (context, blockEvent) => {

	// Setting a variable that will store the Web3 Gateway RPC URL and secret key
	const defaultGatewayURL = context.gateways.getGateway(Network.MAINNET);

	// Using the Ethere.js provider class to call the RPC URL
	const provider = new ethers.providers.JsonRpcProvider(defaultGatewayURL);

	// Logging the block number of the latest mined block
	console.log(await provider.getBlockNumber())

}

// Exporting the default module. Do not change this.
module.exports = { actionFn }
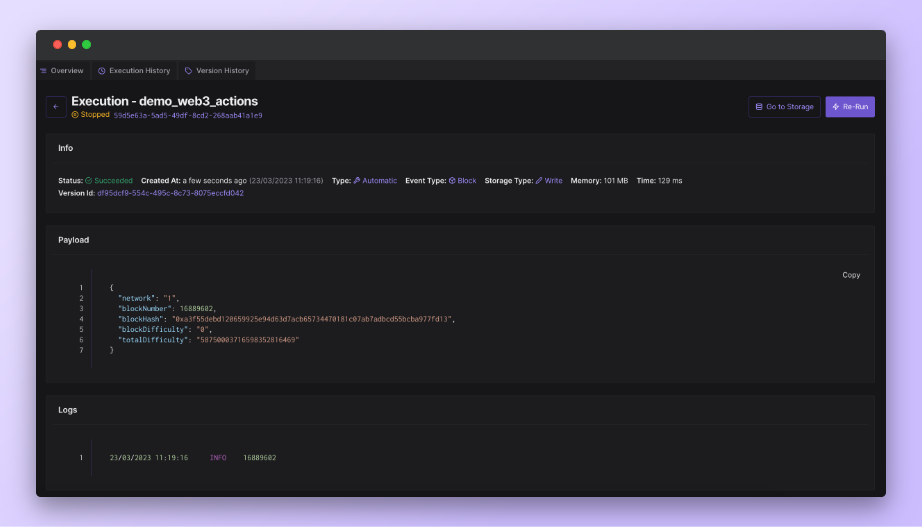
After letting the Web3 Action run for a while, we can check the Dashboard to see the Execution History. The Logs panel indicates that the Web3 Action is logging the latest block number to the console as expected.
This was a pretty simple example showing the feature in action. For a more advanced example of how to access Tenderly Node through your Web3 Actions, check out this practical tutorial. The tutorial shows you how to find contracts with the same bytecode that were deployed by another contract using Web3 Actions and Tenderly Node.
The complexities simplified into a single line of code
Access to Tenderly node gateways is enabled through the context object in Web3 Actions. To dig deeper into the context object, take a look at the documentation.
gateways gives you access to the getGateway() function that allows you to fetch a specific network. This function accepts one required argument — the name of the network you want to access.
Network is also an object that contains all available networks supported in Tenderly Node.
If you want to access the Mainnet, for example, you can simply define Network.MAINNET. This same format applies to other supported networks within the node, such as Optimism, Arbitrum, Polygon, Base, and others.
Notice that you are not required to include RPC secret keys in your function code. Tenderly takes care of the secrets and everything else in the background for you, helping you write cleaner and more secure code.
In case you need to reset your RPC secret keys, the changes will automatically be reflected across your Web3 Action functions.
There’s no need for you to manually update the secret keys, as you would if you used third-party node providers in your Web3 Action functions. This way, you’re also eliminating the risk of something breaking unintentionally when you reset your RPC secret keys.
Build and deploy Web3 Actions faster via CLI
You are not limited to using the Dashboard to deploy and manage Web3 Actions. If you are building a more complex system and prefer to do things with code, you can also develop Web3 Actions locally and deploy them via CLI.
Check out the full list of CLI commands for deploying and managing Web3 Actions in our documentation.
Ready to get started with Web3 Actions and Tenderly Node?
If you have a Tenderly account, you get access to Web3 Actions and Tenderly Node out of the box. Log into your account or create an account if you don’t have one, and launch your first Web3 Action with a couple of clicks.
Tenderly Node will automatically be configured on your account, giving you instant access to the Mainnet and testnets without additional set-up.
Subscribe to our newsletter