In this tutorial, you’ll learn how to create and deploy a smart contract to a private development and testing network.
First, you’ll set up HardHat, a smart contract development environment, and write a smart contract in Solidity. Next, you’ll set up a Tenderly DevNet, a zero-setup environment for smart contract development and testing.
With a DevNet, you can easily acquire some test ETH from an unlimited faucet. You’ll use this private environment to deploy and try out a smart contract against real-time Ethereum Mainnet data. Finally, you’ll execute a contract function with updated parameters using Tenderly to see detailed execution information in a human-readable format.
As a full-stack infrastructure provider, Tenderly is an essential component of the web3 tech stack. It enables you to develop, test, debug, optimize, and deploy your smart contracts on Ethereum and other EVM-compatible networks.
Plus, Tenderly DevNets are complementary to HardHat, so you have all the powerful tools you need to build and deploy reliable, foolproof smart contracts.
So, let’s get started!
1. Set up a Tenderly account to use Tenderly DevNets
First, go to Tenderly and follow a few simple steps to set up your account. You can either use your email or sign up with Google or GitHub. Tenderly will send you a verification email. Once your email is verified, you’re good to go.
For this tutorial, we’ll use Tenderly DevNets to execute transactions in a local environment. Once you log in, you’ll land on the DevNets page. Here, click the Experience DevNets button to create your first DevNet.
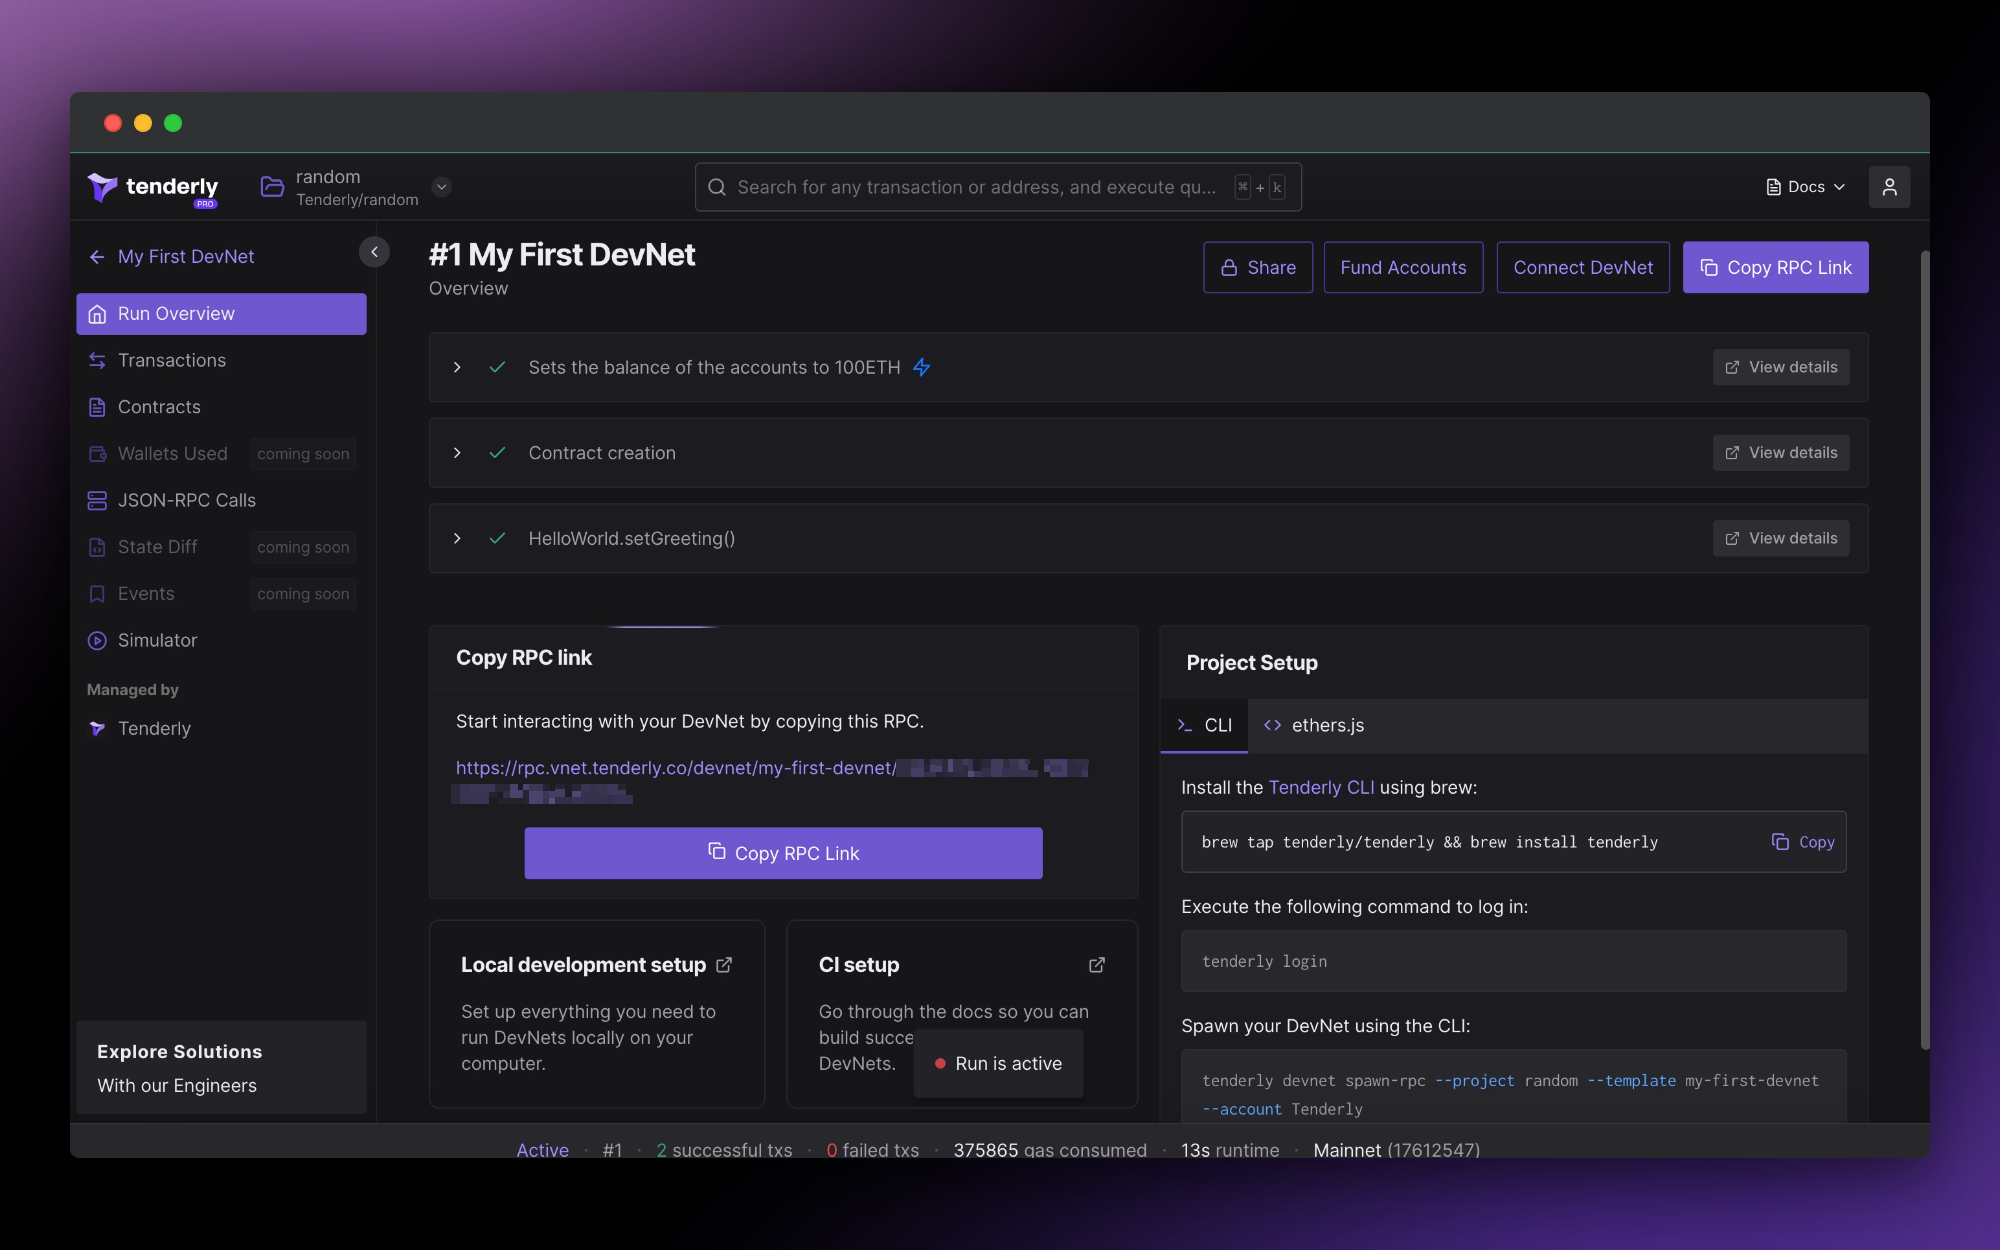
Once you spawn your first DevNet, the Run Overview page will open, displaying the run details and the RPC URL of your DevNet. Here, you can copy the DevNet RPC and use it in the later steps.
2. Get some test ETH on a DevNet
Before you proceed:
- Smart contract creation and testing aren't typically done on the Ethereum Mainnet, but rather on one of the Ethereum testnets.
- However, with Tenderly DevNets, you get a zero-setup, private network with up-to-date production data and fresh Mainnet states, where you can execute transactions instantly.
- A DevNet also allows you to get an unlimited supply of test ETH within seconds instead of struggling to get tokens from a public faucet.
- Spinning up a DevNet also allows you to address potential bugs right away and ensure that your code executes as expected before you deploy it to the Ethereum Mainnet.
Feel free to proceed:
- Each Tendely DevNet comes prefilled with 100 test tokens you can use for your development and testing purposes.
- However, you can use different custom RPC methods on DevNets to manipulate the state of your private network, including adjusting the balance of your account.
- So, to give yourself a lot of ETH, simply use
tenderly_setBalance.
3. Compile and deploy a smart contract using Hardhat
With the basic setup now complete, you can dive into creating a blockchain smart contract.
3.1. Install Hardhat
To set up Hardhat, you need to install the following two packages on your system:
- node.js (we used v18.9.0)
- npm (we used v8.19.1)
Fire up a terminal and complete the following steps:
- Create a directory for your project
mkdir tenderly_deploy_tutorial && cd tenderly_deploy_tutorial - Initialize the project (this will create the package.json file)
npm init -y - Install Hardhat
npm install hardhat - Create a Hardhat project
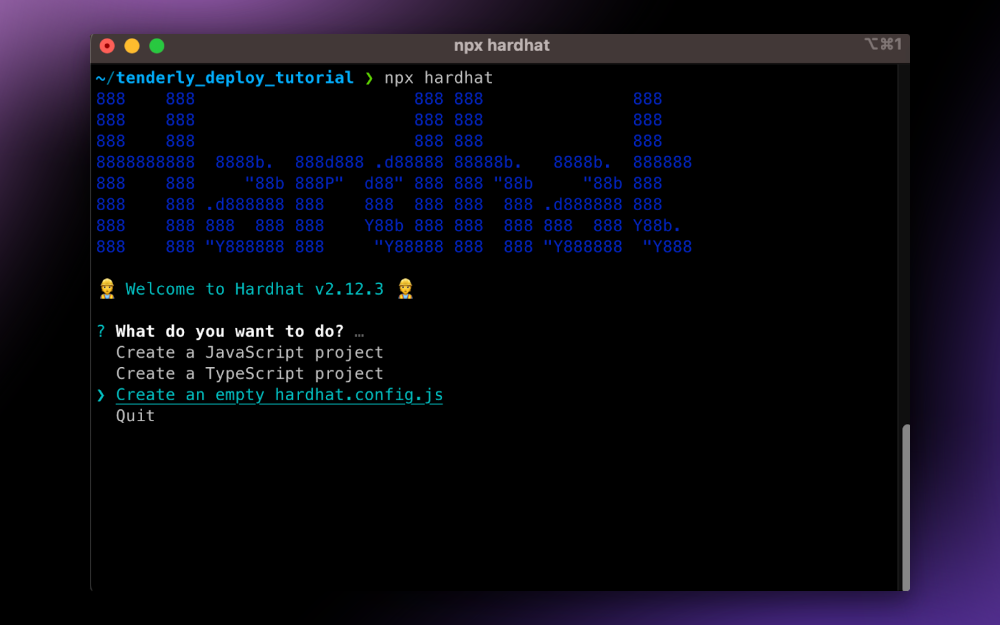
npx hardhat Select the “empty hardhat.config.js” option:
6. Add libraries to your project. We’ll use ethers to interact with the blockchain and dotenv to hide our secrets. 🤫npm install @nomiclabs/hardhat-ethers ethers dotenv
7. Let’s also add the Tenderly plugin for Hardhat that automatically verifies your smart contract and uploads it to Tenderly. It’s important to verify your smart contract to enable all the functionalities of Tenderly features.
npm install @tenderly/hardhat-tenderly
3.2 Prepare the Ethereum smart contract code
Create a directory for smart contracts and create a contract file:
mkdir contracts && touch contracts/Greeter.sol
Instead of writing a smart contract from scratch, use a ready-made smart contract example for this tutorial. Paste the following code in your newly created Greeter.sol file:
//SPDX-License-Identifier: Unlicense
pragma solidity ^0.8.0;

contract Greeter {
  string private greeting;

  constructor(string memory _greeting) {
    greeting = _greeting;
  }

  function greet() public view returns (string memory) {
    return greeting;
  }

  function setGreeting(string memory _greeting) public {
    greeting = _greeting;
  }
}
3.3. Complete the Hardhat config
Create a .env file that will contain secret information such as your private key and the Tenderly DevNet RPC URL.
touch .env
Open up the .env file in your text editor of choice and add your private key and the Tenderly URL to it like so:
PRIVATE_KEY = # remove this comment and add your wallet’s private key here
TENDERLY_URL = # remove this comment and add the Tenderly DevNet RPC URL you got from step 1 of this tutorial
This file should be added to your .gitignore list if you’re versioning this project. It’s very important that both your private key doesn't become public. This way, you can share your project configuration, without worrying about others knowing your secrets.
Next, let's modify the hardhat.config.js file. It should import the ethers library, set up the network we’re going to use, and prepare our private key for later.
We’ll also call setup to initialize the Tenderly plugin for automatic smart contract verification. We need to configure the hardhat-tenderly plugin to perform verification automatically and add the verified contract directly to your project.
~/.tenderly/config.yaml under access_key.
require("@nomiclabs/hardhat-ethers");
require("dotenv").config();

// Initialize hardhat-tenderly plugin for automatic contract verification
var tdly = require("@tenderly/hardhat-tenderly");
tdly.setup({ automaticVerifications: true });

// Your private key and tenderly devnet URL (which contains our secret id)
// We read both from the .env file so we can push this config to git and/or share publicly
const privateKey = process.env.PRIVATE_KEY;
const tenderlyUrl = process.env.TENDERLY_URL;

module.exports = {
  solidity: "0.8.17",
  networks: {
    devnet: {
      url: tenderlyUrl,
      // This will allow us to use our private key for signing later
      accounts: [`0x${privateKey}`],
      // This is the mainnet chain ID
      chainId: 1,
    },
  },
  tenderly: {
    // Replace with project slug in Tenderly
    project: "project",
    // Replace with your Tenderly username
    username: "my-username",
    // Perform contract verification in private mode
    privateVerification: true,
  },
};
3.4. Compile the code
To compile your smart contract, run the following command:
npx hardhat compile
HardHat will look for smart contracts in your contracts directory, use the compiler version we specified in the hardhat.config.js file, and store the compilation result in a newly created “artifacts” directory. Again, if you’re versioning your project, you might want to add the artifacts directory to your .gitignore list.
You may have already been through this process before, but what really happens when you compile a smart contract?
First, the Solidity compiler identifies all functions, events, and errors in your smart contract and makes an ABI (Application Binary Interface) based on them. Anyone (on- or off-chain) can use the ABI to interact with the smart contract once it’s deployed. You can think of the smart contract ABI as the interface of the contract directed at the outside world. You can see the ABI for your smart contract in artifacts/contracts/Greeter.sol/Greeter.json.
{
  "abi": [
  {
    "inputs": [
    {
      "internalType": "string",
      "name": "_greeting",
      "type": "string"
    }
    ],
    "stateMutability": "nonpayable",
    "type": "constructor"
  },
  {
    "inputs": [],
    "name": "greet",
    "outputs": [
    {
      "internalType": "string",
      "name": "",
      "type": "string"
    }
    ],
    "stateMutability": "view",
    "type": "function"
  },
  {
    "inputs": [
    {
      "internalType": "string",
      "name": "_greeting",
      "type": "string"
    }
    ],
    "name": "setGreeting",
    "outputs": [],
    "stateMutability": "nonpayable",
    "type": "function"
  }
  ]
}
Another thing you will find in this file is the bytecode of your contract. In fact, the main purpose of compilation is translating the Solidity source code into EVM bytecode that can be stored on an Ethereum-based blockchain. Each instruction in EVM bytecode can be represented numerically. This is why the generated bytecode is represented as a long string of numbers in base 16.
Compiling a smart contract is essentially translating it from human-readable Solidity source code into this bytecode which is optimized for EVM execution. Functionally, both types of code describe identical behavior for the contract. Now that we have our bytecode prepared, it’s time to put it on the blockchain for everyone to see and use.
3.5. Deploy the smart contract
For Ethereum smart contract deployment, we need to make a simple JS script that will use a Tenderly DevNet to access the blockchain and publish our compiled bytecode. First, create the deployment script:
mkdir scripts && touch scripts/deploy.js
This script contains the procedure for deploying the smart contract. It references our configuration to get the private key of the deployer. The script also targets the Tenderly DevNet to get access to the node as if it was running on the Mainnet. The deployment process consists of signing and sending a transaction that contains the contract bytecode without specifying the recipient.
During the deployment procedure, the address for the contract is determined based on the sender’s address and current nonce, so it’s always unique. Once the smart contract deployment is completed, we’ll print out the address at which it’s stored so we can inspect and interact with it.
Next, edit the deployment script scripts/deploy.js with your editor of choice:
const { ethers } = require("hardhat");
require("dotenv").config();

async function main() {
  // Prepare the deployer wallet - this will be based on the private key we set up in config
  const [deployer] = await ethers.getSigners();

  // Prepare the provider - this will give us access to the blockchain via Tenderly DevNet
  provider = new ethers.providers.JsonRpcProvider(process.env.TENDERLY_URL);

  // Greeter will be an ethers internal representation of the compiled contract
  const Greeter = await ethers.getContractFactory("Greeter", deployer);
  console.log("Deploying Greeter...");

  // greeter will be the instance of our contract that we are about to deploy
  const greeter = await Greeter.deploy("Hello from Tenderly!");

  // We wait for the deployment to be completed and confirmed
  await greeter.deployed();
  await greeter.setGreeting("hello");

  // This will tell us the address at which the contract was deployed
  console.log("Greeter deployed to:", greeter.address);
}

// Do the thing!
main()
  .then(() => process.exit(0))
  .catch((error) => {
    console.error(error);
    process.exit(1);
  });
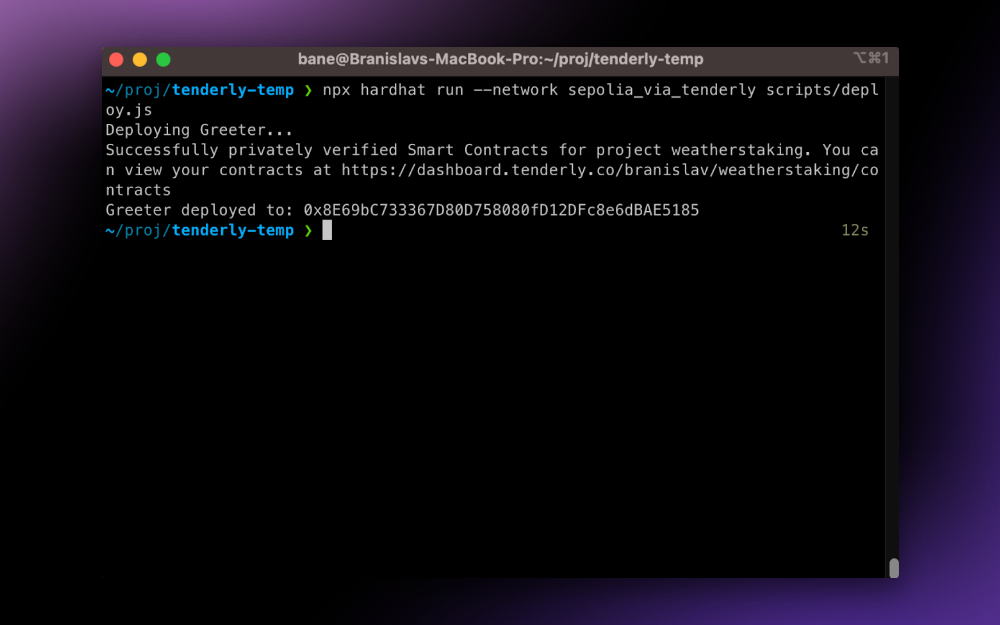
Finally, run the script:
npx hardhat run –network devnet scripts/deploy.js
The script will output the address of your newly deployed contract. The smart contract address in this example is 0x8E69bC733367D80D758080fD12DFc8e6dBAE5185.
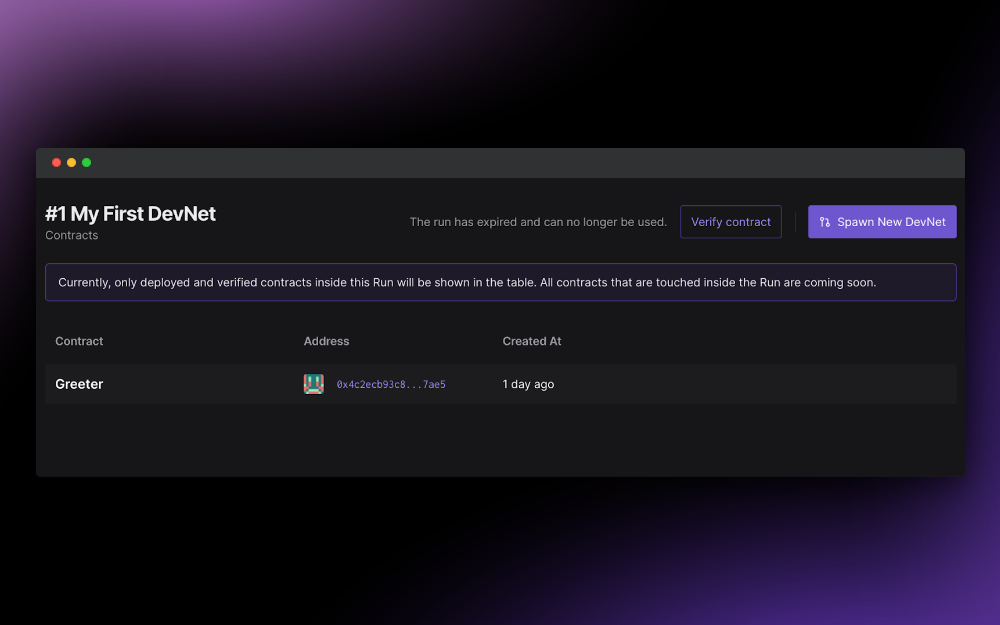
However, since we used automatic contract verification, you don’t need to remember the address. Instead, your contract is automatically added to Tenderly and ready to go.
Congrats! 🎉 Your smart contract is up and running, and you successfully uploaded it to Tenderly. You can find it in the list of contracts in your Tenderly DevNet.
You can now use numerous Tenderly features to optimize your smart contract, reduce gas fees, and debug potential errors. So, let’s get playful!
4. Use Tenderly DevNets to get in-depth transaction insights
With Tenderly DevNets, you get insight into how your smart contract transactions would execute on a real network, without ever having to actually use one. And if you ever want to change smart contract code or adjust some input parameters, you can re-simulate transactions within your DevNet environments.
So, by using Tenderly DevNets, you can:
- Avoid waiting and try out your smart contract swiftly during development, without actually using a test network.
- Replay a failed transaction to gain a deeper understanding of its execution and what went wrong i.e. catch a bug.
- Inspect the bug in detail using Tenderly Debugger to go over each line of code and identify the exact cause of the issue.
- Play around with, test, and validate your bug fixes to make sure your updated contract runs as expected in production.
- Simulate a transaction with updated contract source and/or parameters, including the block number, transaction indexes, address, gas, and value.
Cool, right? 😎 Why not give it a try?
4.1. Re-simulate already executed transactions
To run a simulation, select Transaction that executes the setGreeting function.
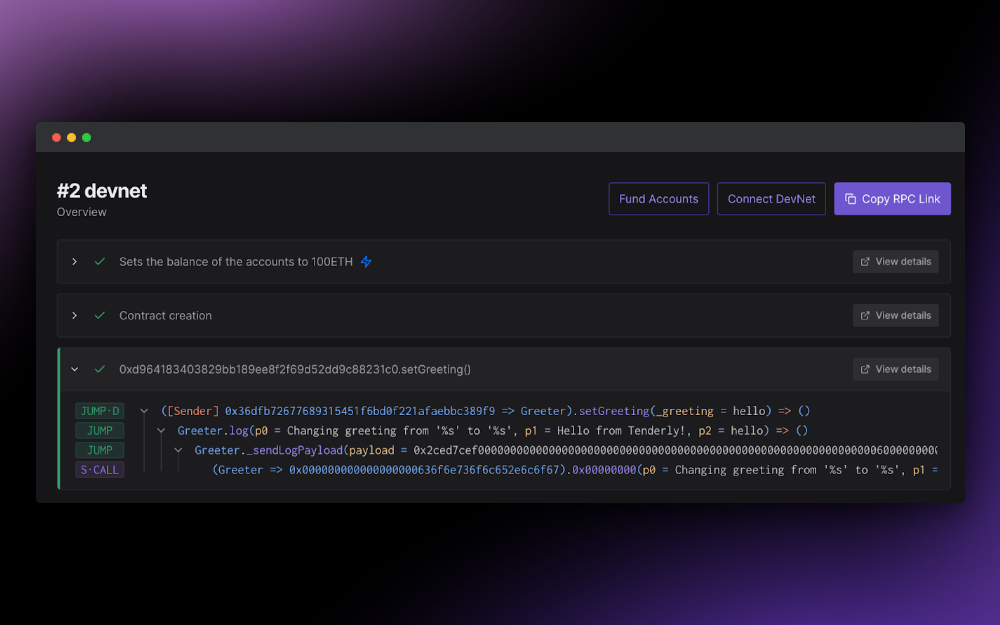
Next, open the Transaction tab within your DevNet environment. Then, click the Re-Simulate button in the top right corner of the screen.
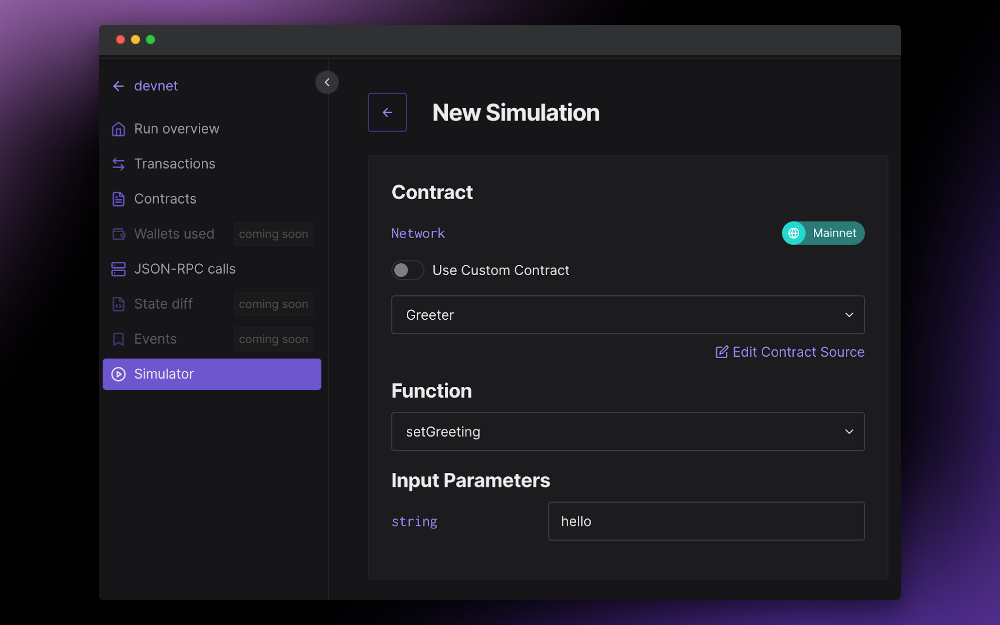
This opens the simulation window. Here, the setGreeting function is already selected in the dropdown menu with all the transaction parameters already pre-populated.
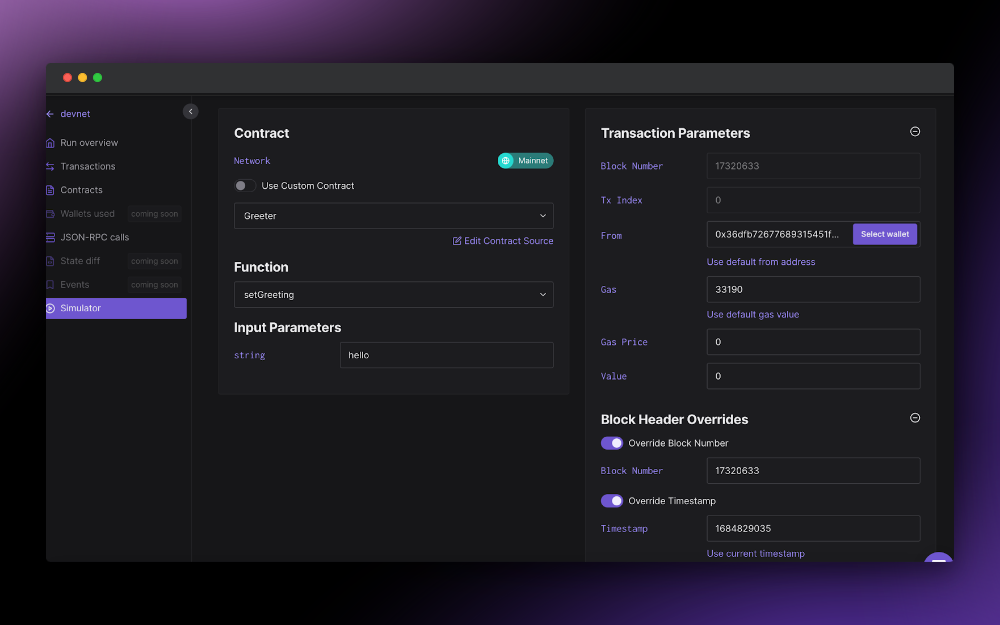
Now, you can run the simulation by clicking Simulate Transaction.
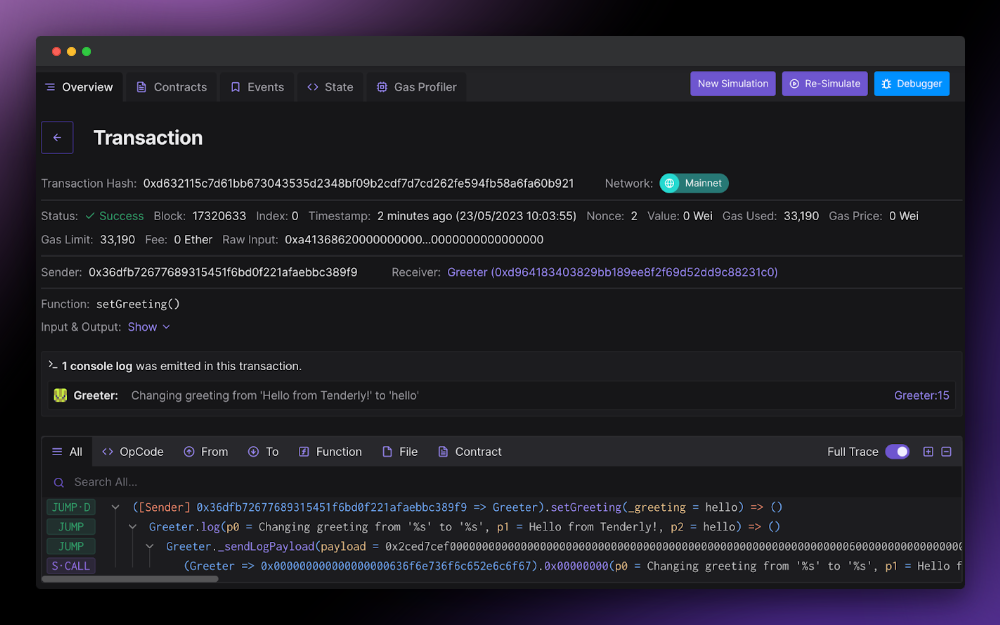
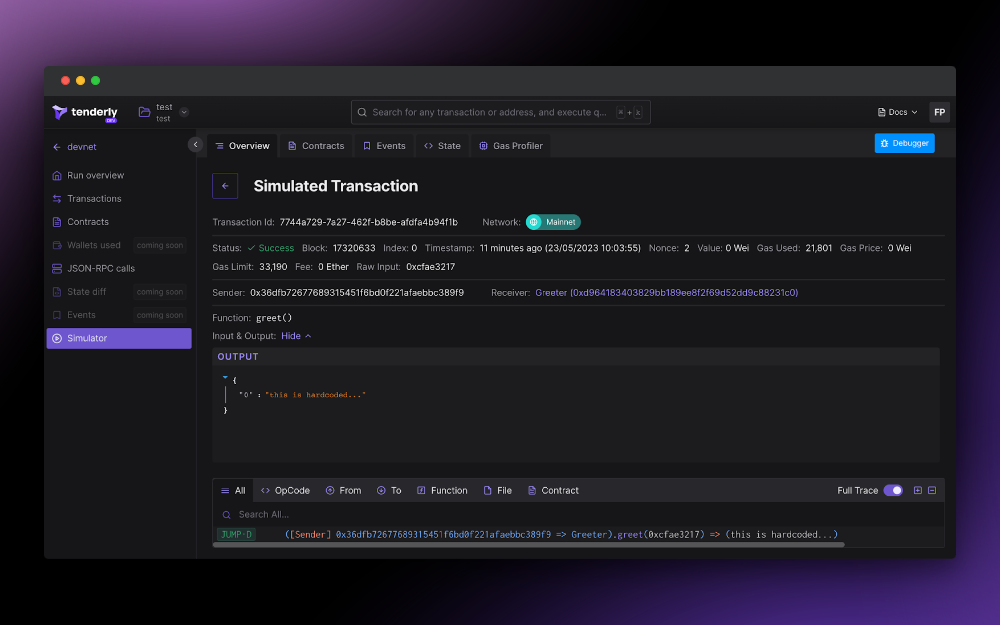
4.2. Check the simulation output
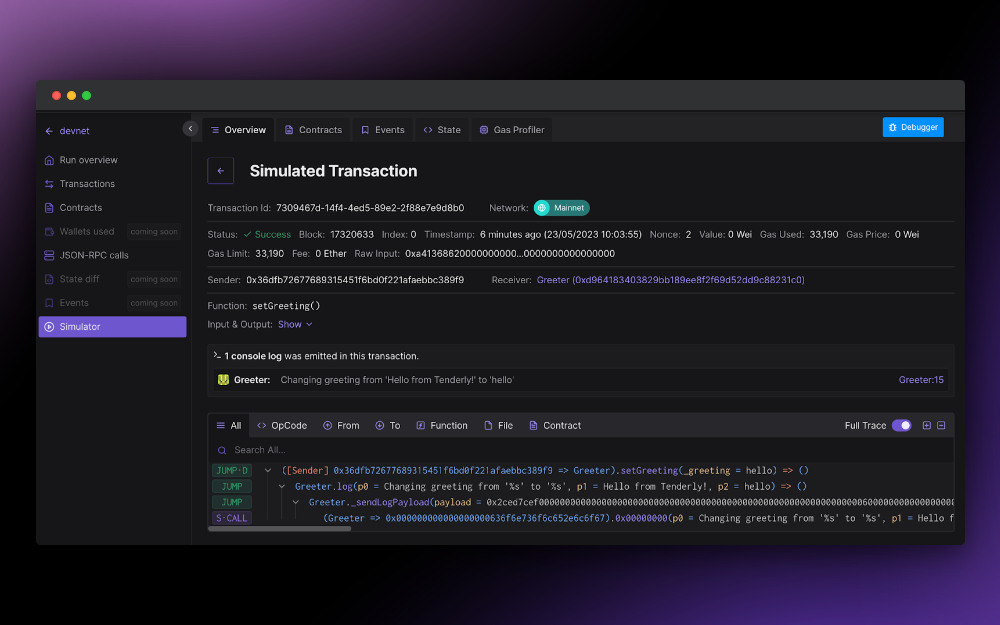
Next, you can see whether your transaction simulation executed successfully or not. You can also find any related information, such as how much gas your transaction used, transaction index, nonce, and other details. By clicking View input data, you can check out the transaction input.
Here's the output of the simulated transaction:
5. Edit the contract source
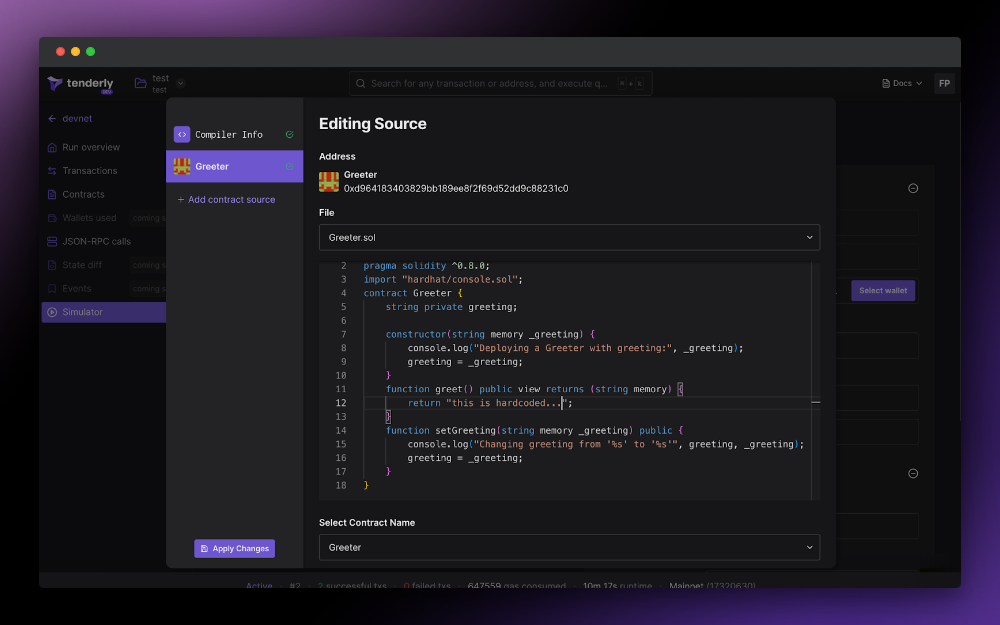
Before re-simulating the transaction, you can change the contract source code by clicking Edit Contract Source.
This opens the Editing Source view where you can see and edit the source.
Next, change the greet() function and replace the return value with a string. Once done, click the Apply Changes button in the bottom left corner and then Simulate Transaction.
Again, you can find the details about your successful transaction in the next view. In the output data section, you’ll find the string you added to the source code.
6. Deploy your smart contract to start experimenting
In just a few steps, you can learn how to create and deploy a smart contract, as well as what’s going on under the hood. With Tenderly’s full-stack infrastructure, you have all the needed tools for developing smart contracts. Plus, Tenderly DevNets are complementary to HardHat, so you can easily introduce them into your development flow.
Ready to level up? Try to build a real multisignature wallet to send and secure your ETH. Start by using Tenderly’s full-stack infrastructure to build, test, optimize, and monitor your smart contracts in one place. So, start using DevNets and discover the easy way of developing and deploying smart contracts.