When learning Web3 development, beginner developers often start by playing around with sending simple transactions on-chain. This is one of the several basic ways to interact with the Ethereum blockchain.
But to send transactions, you need an entry point to the blockchain — an Ethereum node. You can install and run a node yourself or use a managed node as a service solution like Tenderly Node.
A managed node solution makes the process of sending transactions more convenient and streamlined. It eliminates the need for you to install or manage your own node infrastructure, which can be tricky.
In this quick tutorial, you'll learn how to send Ether from one wallet to another without relying on a third-party exchange. To do this, you'll learn how to use Metamask, Ethers.js, Web3.py, and Tenderly Node as the infrastructure solution for sending transactions.
Use the newly released Tenderly Node Extensions to customize how you interact with the blockchain through Tenderly Node. Create custom RPCs that go beyond the standard set of APIs.
Try Node ExtensionsPrerequisites
To follow along with this tutorial, you should be familiar with:
- Ethereum blockchain fundamentals (Ether, wallets, faucets, Mainnet and testnets, etc.)
- JavaScript or Python (code snippets included)
- Command Line Interface (CLI)
You also need a Tenderly account, which you can create here for free.
Tenderly is an all-in-one Web3 development platform that is an essential part of the Web3 tech stack. It enables developers to build, test, monitor, and operate smart contracts from their inception to mass adoption.
The platform gives you access to in-depth debugging tools combined with observability and infrastructure building blocks to accelerate smart contract development.
Set up Tenderly Node
Before proceeding, you first need to set up Tenderly Node, which will give you access to the blockchain and allow you to send transactions.
Log into your Tenderly account or create one for free and go to the Tenderly Node interface.
At the very top, you’ll see a list of supported networks.
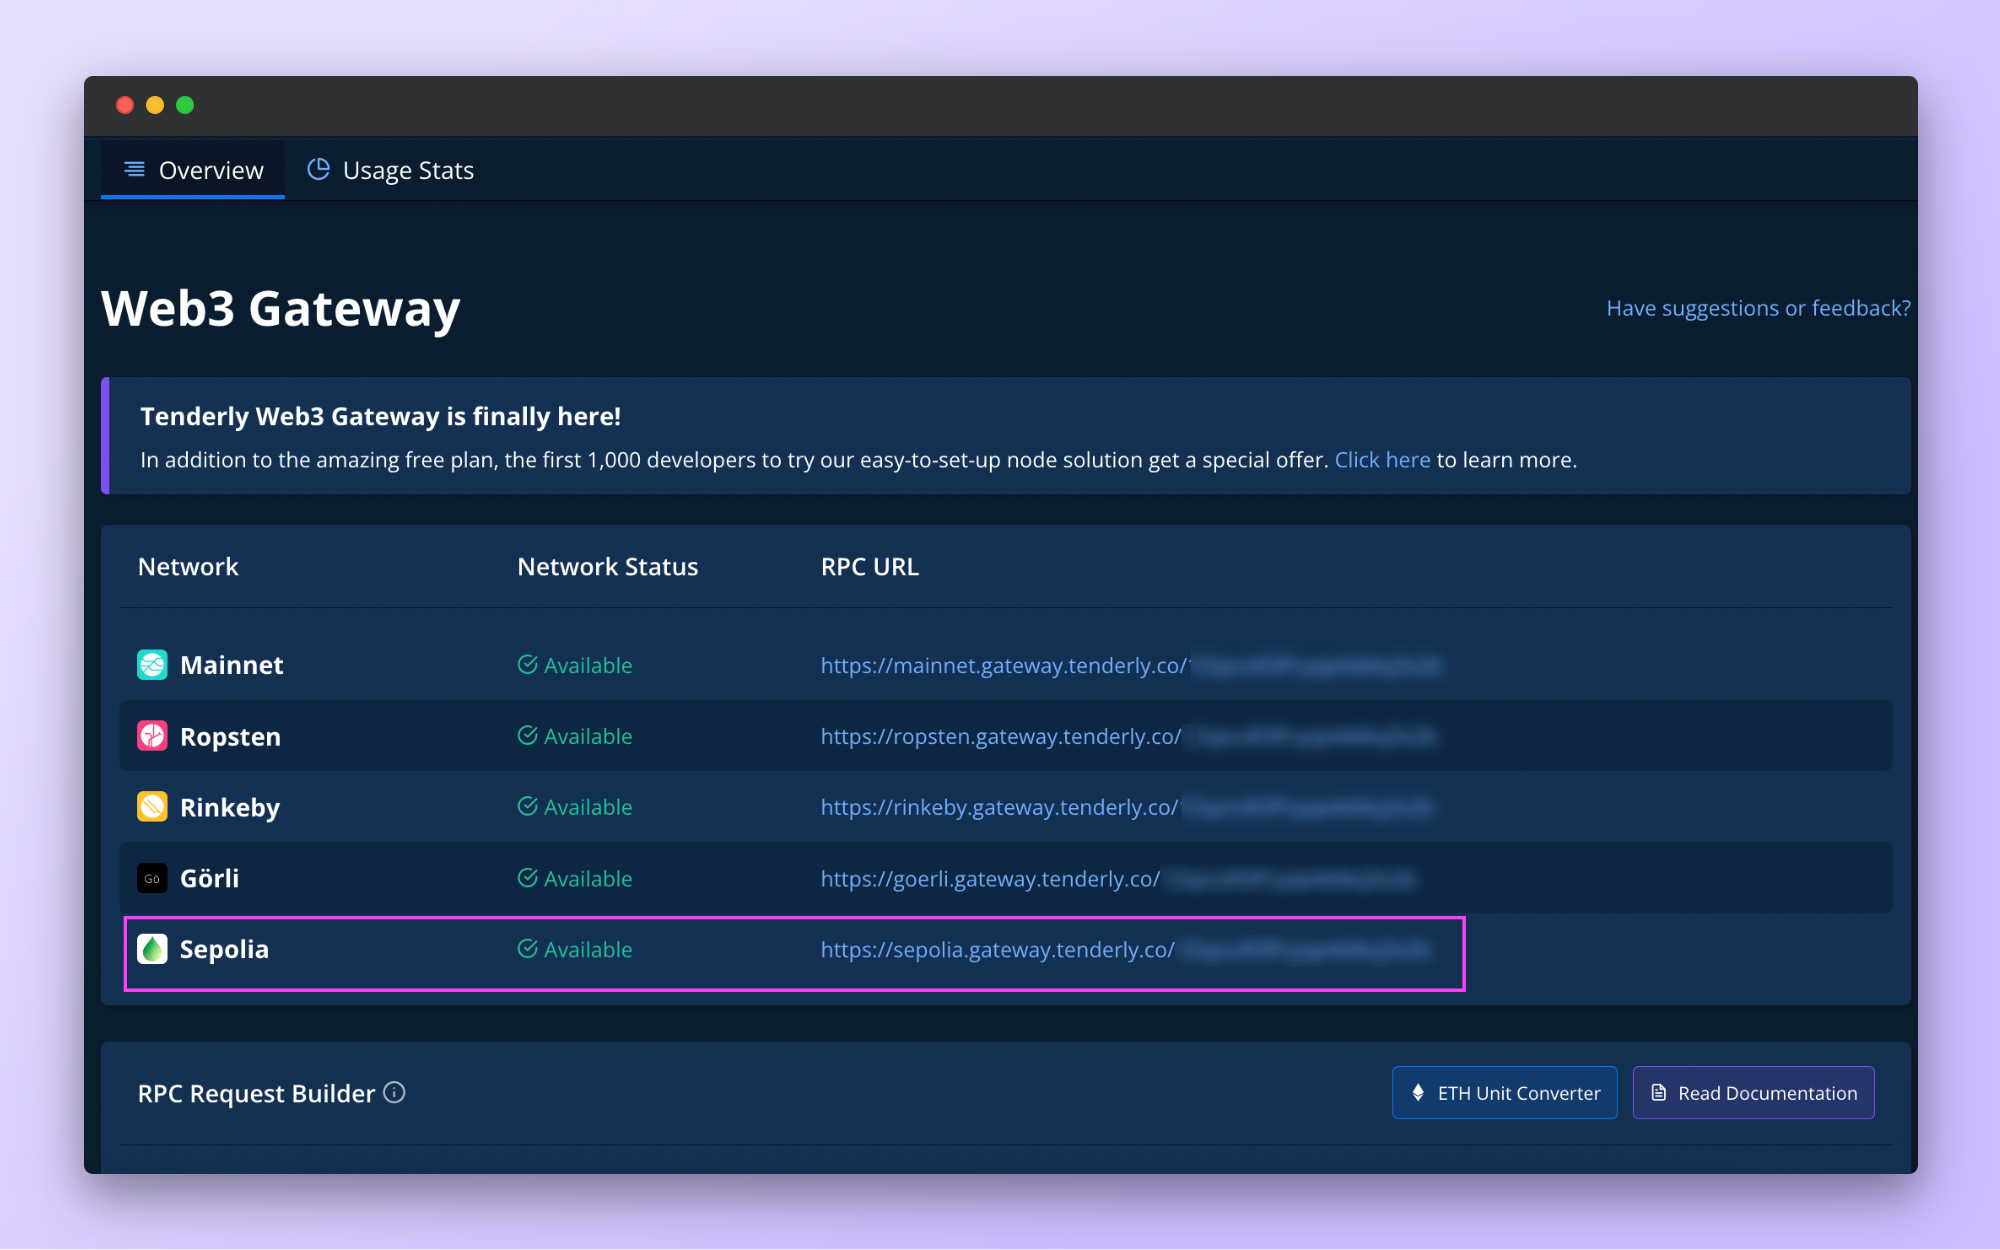
This tutorial will demonstrate how to send transactions on the Sepolia testnet without spending real money. However, you can use the Mainnet RPC URL if you’re committed to sending real Ether. The steps are identical for both approaches.
Find the Sepolia test network and copy the RPC URL.
A word of caution: The last part of the RPC URL contains your security access token. Make sure not to expose it publicly. In case you do, scroll down to Access Control to reset it.
To send transactions on the Sepolia network, you also need to add SEP (currency used on Sepolia) to your wallet if you don’t have any already. You can use a Sepolia faucet to mine some free SEP.
Send transactions with Metamask via Tenderly Node
With your Tenderly Node all set up, let’s move on to connecting it to Metamask.
Metamask allows you to send and receive transactions on the Mainnet and popular test networks through different node providers via JSON-RPC. To access the Sepolia testnet, you need to add Tenderly Node manually as a network in Metamask.
Open Metamask and, from the top, click on the networks dropdown and then Add network.
This will open up Metamask Settings.

Scroll down and click on Add a network manually.
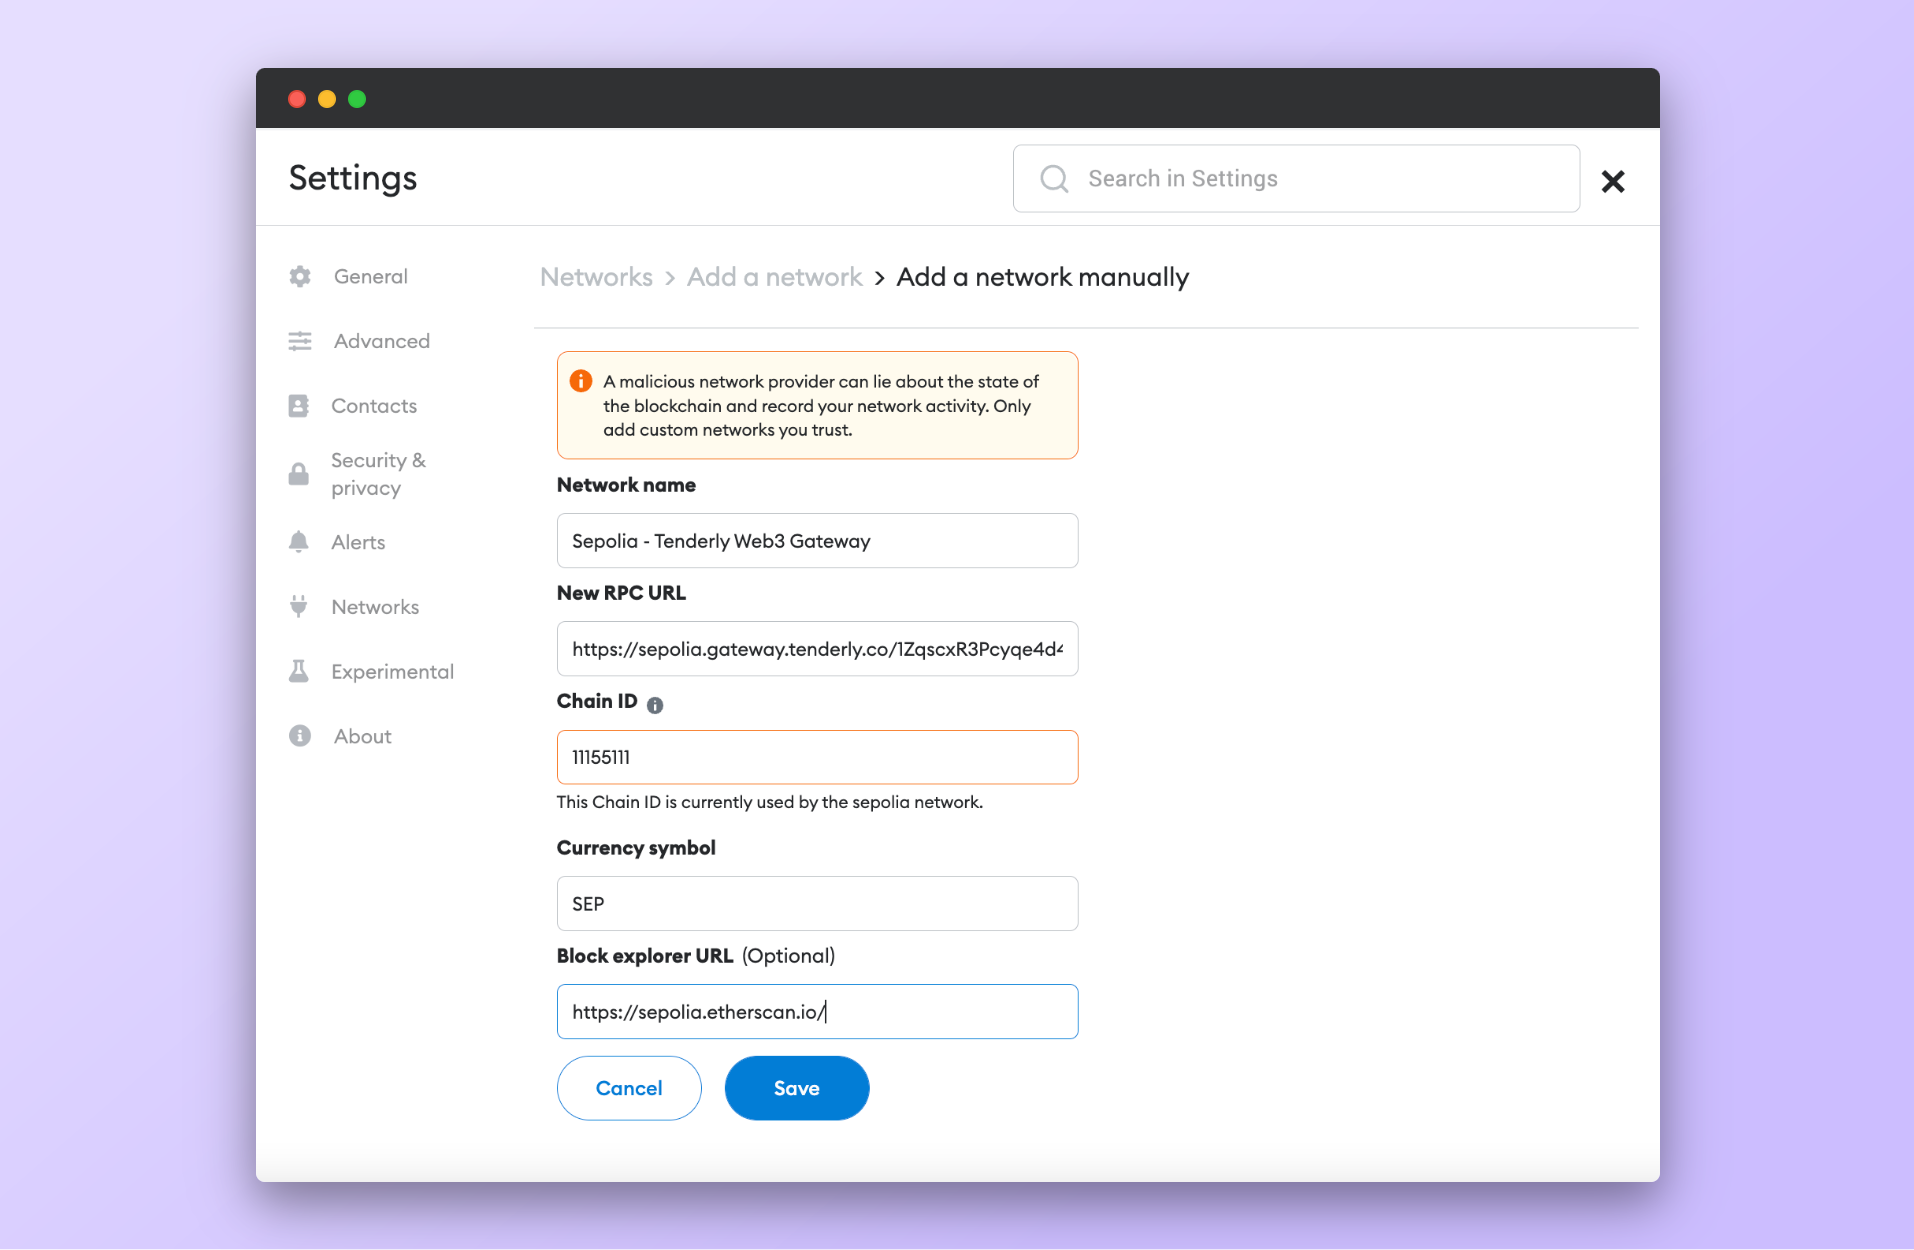
Fill out the available fields with the following information:
- Network name: This can be anything
- New RPC URL: Paste here the Sepolia RPC URL that you copied from Tenderly Node
- Chain ID: Sepolia’s chain ID is “11155111” (Find the list of all chain IDs here)
- Currency symbol: SEP (currency used on the Sepolia testnet)
- Block explorer URL: https://sepolia.etherscan.io/
Click Save once you’re done.
Now you can start sending transitions from Metamask using Tenderly Node as your access point to the Sepolia testnet.
Send transactions with Ethers.js via Tenderly Node
Ethers.js is a JavaScript library that allows you to build decentralized applications (dapps) and interact with the Ethereum blockchain. It gives you a set of utilities for creating, deploying, and interacting with smart contracts on the network.
You can also use Ethers.js to send simple transactions like transferring Ether on the Mainnet and currencies used by other EVM-based networks as well as testnets.
To send transactions programmatically with Ethers.js, you need to have npm and Node.js installed on your system.
If you already have all of this installed, you can continue by following the steps below.
Step 1: Create a new directory, go into it, and initialize the project
mkdir tenderly-tx
cd tenderly-tx
npm init -y
Step 2: Install Ethers.js
npm install --save-dev ethers dotenv
Step 3: Create a .env file to store your secret keys
touch .env
Add the following variables to the .env file and assign them the appropriate values.
TENDERLY_URL = XXXXXXXXXXX
PRIVATE_KEY = XXXXXXXXXXX
To get the Tenderly URL, go to the Tenderly Dashboard and copy the Sepolia RPC URL, which has the following structure:
https://{NETWORK_NAME}.gateway.tenderly.co/{ACCESS_TOKEN}
The PRIVATE_KEY is your private wallet key.
Step 4: Create the script
Now, let’s build out the script for sending ETH with Ethers.js via Tenderly Node. If you’re looking for a copy/paste approach, visit our GitHub repo to get the complete script.
At the top of the file, you need to require the ethers library and the .env file and define the address of the receiver wallet.
const { ethers } = require ("ethers");
require ("dotenv").config();

// Add the address of the wallet receiving the funds
const destinationAddress = "";
Next, define the main function and add the following configurations.
You need to specify the provider, which is, in our case, Tenderly Node. The RPC URL is stored in the TENDERLY_URL variable, which is pulled from the .env file.
provider = new ethers.providers.JsonRpcProvider(process.env.TENDERLY_URL);
You also need to specify the address of the wallet which will be sending the transaction and store it in a variable sender. This data is also pulled from the .env file.
const sender = new ethers.Wallet(process.env.PRIVATE_KEY, provider);
Next, define a variable balanceBefore to retrieve the balance on the sender wallet. You can add a simple console.log statement to output this information in the Terminal.
const balanceBefore = await provider.getBalance(destinationAddress);

console.log(`Destination balance before sending: ${ethers.utils.formatEther(balanceBefore)} ETH`);
console.log("Sending...\n");
The following step involves defining a variable tx to specify how much currency you want to send to the destination wallet. For example, let’s send 0.001 SEP.
To keep track of the transaction execution, you can add console.log statements to notify you when the transaction is sent and get the hash and the receipt of the transaction.
const tx = await sender.sendTransaction({to: destinationAddress, value: ethers.utils.parseEther("0.001")});
console.log("Sent! 🎉");
console.log(`TX hash: ${tx.hash}`);
console.log("Waiting for receipt...");
The next line of code waits for one block to get validated after the block containing the transaction or 150 seconds. The console.log statement will log the link of the transaction hash, which you can open up in Tenderly to inspect the transition in more detail.
await provider.waitForTransaction(tx.hash, 1, 150000).then(() => {});
console.log(`TX details: https://dashboard.tenderly.co/tx/sepolia/${tx.hash}\n`);
To confirm that the value change has occurred, you can use the code snippet below to log the new balance on the destination wallet to the console.
const balanceAfter = await provider.getBalance(destinationAddress);
console.log(`Destination balance after sending: ${ethers.utils.formatEther(balanceAfter)} ETH`);
Finally, call the main() function to ensure the code gets executed.
main ()
    .then(() => process.exit(0))
    .catch((error) => {
        console.error(error);
        process.exit(1);
    });
To run the script, simply execute it through Node.js.
node tenderly_tx.js If your transaction is successful, you’ll see the transaction hash in the Terminal as well as a link to the transaction in Tenderly.
Copy this link and paste it into your browser to inspect the transaction with Tenderly, open it in Debugger, or re-simulate it on a Fork.
Send transactions with Web3.py via Tenderly Node
Web3.py is a Python library for interacting with the Ethereum blockchain. Similar to Ethers.js, it allows you to deploy smart contracts, send transactions, and interact with the blockchain but with Python.
To continue, you’ll need to have Python and pip3 installed on your system.
Step 1: Create a new directory, navigate into it, and install the Web3 library
mkdir python-tx
cd python-tx
pip3 install web3
Step 2: Set environment variables for Tenderly Node and your wallet private key
Place your wallet private key in the PRIVATE_KEY variable and the RPC URL that you copied from the Tenderly Node interface in the TENDERLY_URL variable.
Make sure not to store the values for the variables in quotes.
If you’re on Linux or Mac, run the following commands from the Terminal:
export TENDERLY_URL=https://sepolia.gateway.tenderly.co/XXXXXXXXXXX
export PRIVATE_KEY=XXXXXXXXXXX
To get the Tenderly URL, go to the Tenderly Dashboard and copy the Sepolia RPC URL, which has the following structure:
https://{NETOWKR_NAME}.gateway.tenderly.co/{ACCESS_TOKEN}
Step 3: Create the script
While still in the python-tx directory, create a Python file named send_tx.py. This is where you’ll write the script code.
touch send_tx.py
If you want to skip the explanations below, feel free to copy/paste the final code for this script from our GitHub repo.
The first thing you need to do is import the necessary libraries needed to send transactions.
import os
from web3 import Web3
from web3.gas_strategies.rpc import rpc_gas_price_strategy
Next, define the variable web3, which will set up Tenderly Node as your node provider. The RPC URL is pulled from the TENDERLY_URL environment variable you defined in Step 2.
web3 = Web3(Web3.HTTPProvider(os.getenv("TENDERLY_URL")))You also need to define the private key as well as the sender and receiver addresses and store this information in corresponding variables like so:
sender = {
    "private_key": os.getenv("PRIVATE_KEY"),
    "address": "",
}
receiver = ""
Moving on, you can query the blockchain to get the balance on the receiver wallet and print this information to the Terminal like so:
receiverBalance = web3.eth.getBalance(receiver)
receiverBalanceETH = web3.fromWei(receiverBalance, "ether")
print(f'Destination balance before transfer: {receiverBalanceETH} ETH')
For convenience, you can ask the provider to suggest the gas price using the Web3.py library.
web3.eth.set_gas_price_strategy(rpc_gas_price_strategy)Now the fun part!
Let’s create the transaction and store it in a variable tx_create and sign it. This variable needs to be in the form of a dictionary and include information such as the nonce, gas price, to and from addresses, how much currency we want to send as well as the ID of the Sepolia testnet.
tx_create = web3.eth.account.sign_transaction(
    {
        "nonce": web3.eth.get_transaction_count(sender["address"]),
        "gasPrice": web3.eth.generate_gas_price(),
        "gas": 21000,
        "to": receiver,
        "value": web3.toWei("0.001", "ether"),
        "chainId": 11155111,

    sender["private_key"],
)
The next step is to send the transaction and wait for the receipt.
tx_hash = web3.eth.send_raw_transaction(tx_create.rawTransaction)
print("Sent! 🎉")
print(f"TX hash: { tx_hash.hex() }")
print("Waiting for receipt...")
tx_receipt = web3.eth.wait_for_transaction_receipt(tx_hash)
Finally, let’s print the link to the transaction hash, which you can open up in Tenderly to inspect it further.
print(f"TX details: https://dashboard.tenderly.co/tx/sepolia/{tx_hash.hex()}")
receiverBalance = web3.eth.getBalance(receiver)
receiverBalanceETH = web3.fromWei(receiverBalance, "ether")
print(f'Destination balance after transfer: {receiverBalanceETH} ETH')
To run the script, simply execute it through Python with the following command:
python3 send_tx.pyThe script will print the following output to the console if the transaction is successful, along with a link to the Tenderly Dashboard.
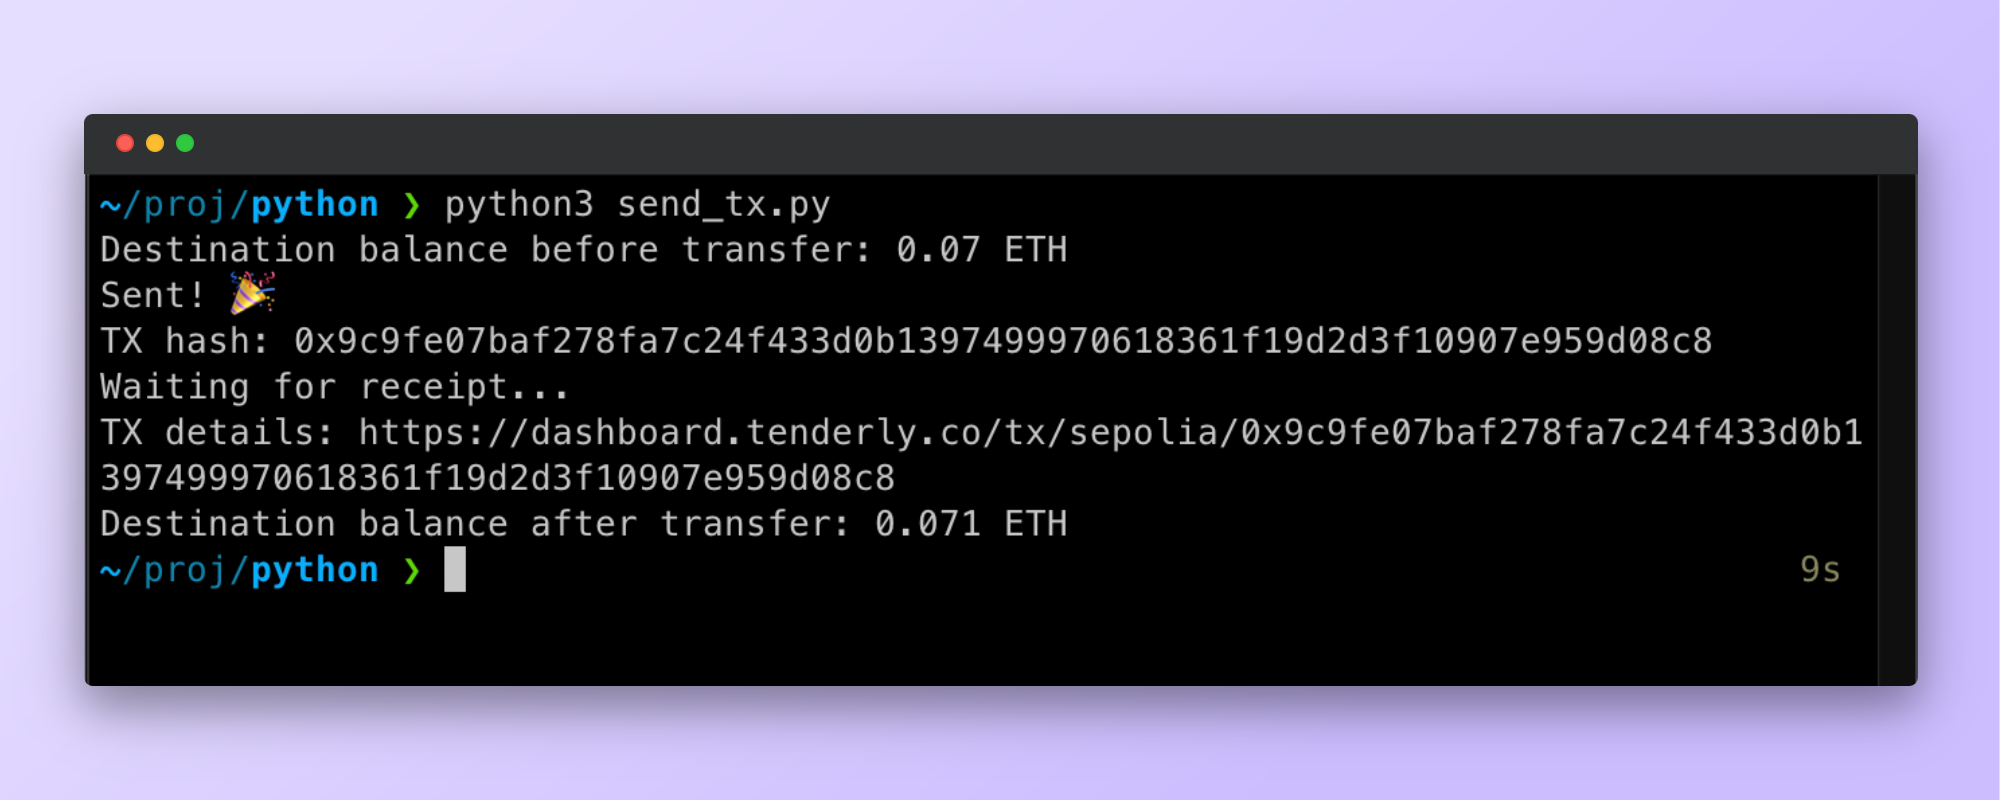
You can copy and paste this link into your browser to open the transaction in Tenderly and inspect it further with Debugger or re-simulate it on a Fork.
Get started with Tenderly Node
Tenderly Node is a managed node-as-a-service solution that gives you secure, reliable, and consistent access to the blockchain. It’s fully integrated with powerful Tenderly development tooling and observability.
To start sending requests and transactions through Tenderly Node, all you have to do is add a single RPC URL to your code, as you saw in this tutorial.
If you have a Tenderly account, you already have free access to Tenderly Node. Use this link to go directly to Tenderly Node and start sending transactions.